This code took me days to understand. It was extremely difficult for me to achieve this simple but very important and useful gadget of coding in native Java for developing Android apps, the notifications. I’m not going to explain every single part of this code, because I’m taking for sure that you have, at least, a medium knowledge of how to work with:
- Java
- PHP
- MySQL
- Having a FTP Server
Ok, so now lets get started with the first part of this tutorial…
THE SETUP
Firstly you will need to go to Google APIs Console page and create a new project.
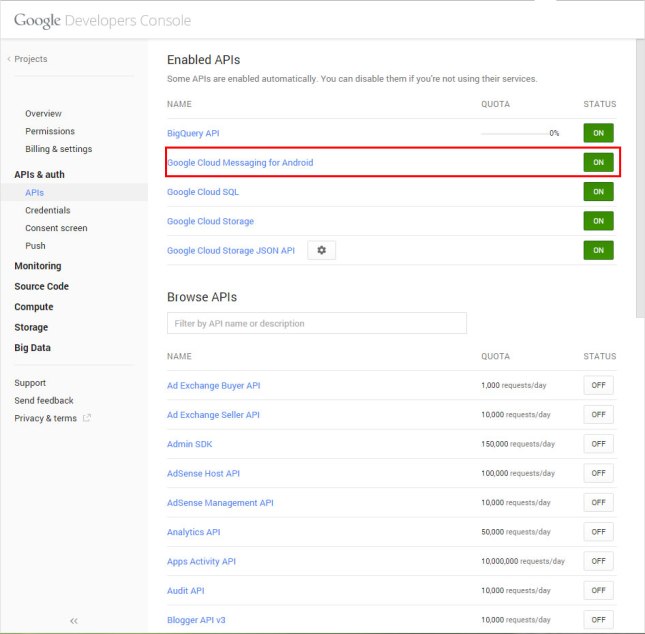
Secondly, select your project and on the Overview label, copy the Project Number shown at the top and save it in some document because we are going to use it later. Then click on the label APIs & auth, APIs. Here you will need to look for Google Cloud Messaging for Android and turn it ON.
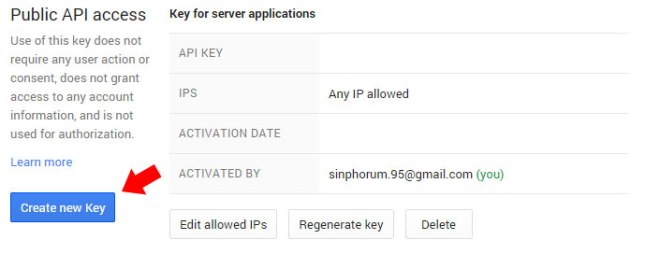
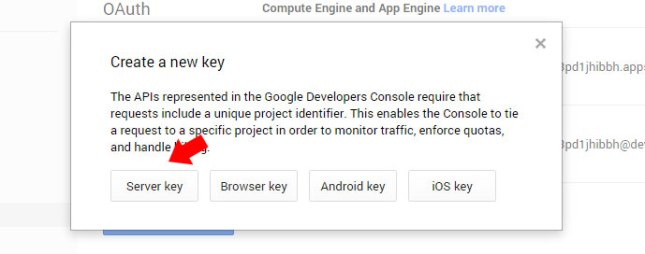
Thirdly, go to Credentials and create a new Public API access Server key. Don’t write anything in that textarea and press Create. Copy the API KEY and save it in a document or something because we are going to use it later.
DATABASE AND MYSQL
Now that we’ve finished setting up our project in Google, we’ll need to create a database in our server for storing the different users’ ids. Later we’ll need them to send the notifications right into their devices.
Don’t make anything too fancy for this tutorial. Just keep it simple:
- ID (being Primary key and with AUTO_INCREMENT)
- Username, Password, Email, Address, etc. (Optional)
- GCM_REGID (it can be TEXT or BLOB if you want it to be safer)
Example:
CREATE TABLE IF NOT EXISTS `gcm_users` (
  `id` int(11) NOT NULL AUTO_INCREMENT,
  `gcm_regid` text,
  `name` varchar(50) NOT NULL,
  `email` varchar(255) NOT NULL,
  `created_at` timestamp NOT NULL DEFAULT CURRENT_TIMESTAMP,
  PRIMARY KEY (`id`)
) ENGINE=InnoDB DEFAULT CHARSET=latin1 AUTO_INCREMENT=1 ;
PHP
Now, our goal will be to create a PHP file that can send the GCM_REGID from our phone to the database and store it. For achieving that, you’ll have to code something like this:
regid.php
<?php

mysql_connect("host", "username", "password");
mysql_select_db("databaseName");

$Username = $_POST['Username'];
$RegID = $_POST['RegID'];

include "conexion.php";

mysql_query("UPDATE users SET regid='$RegID' WHERE username='$Username'");

?>
Now we will create another PHP but now, it’ll be for sending our notifications to our receiver.
This piece of code uses CURL, it’s an extension of PHP. So if you are using WAMP as your host go to the icon on the taskbar, left click, PHP, PHP Extensions and select php_curl.
Pay attention to this code, it won’t be so easy to understand at first sight. Don’t worry, I’ll be explaining it afterwards…
sendgcm.php
<?php

mysql_connect("host", "username", "password");
mysql_select_db("databaseName");

$Username = $_POST['Username'];
$Victim = $_POST['Victim'];
$Message = $_POST['Message'];

$registrationIDs = array();
$sql = mysql_query("SELECT regid FROM users WHERE username = '$Victim'");
while($query_row = mysql_fetch_assoc($sql))
{
	$registrationIDs[] = $query_row['regid'];
}

    // Replace with the real server API key from Google APIs
    $apiKey = "API key";

    // Set POST variables
    $url = 'https://android.googleapis.com/gcm/send';

    $fields = array(
        'registration_ids' => $registrationIDs,
        'data' => array( "Username" => $Username, "Message" => $Message )
    );
    $headers = array(
        'Authorization: key=' . $apiKey,
        'Content-Type: application/json'
    );

    // Open connection
    $ch = curl_init();

    // Set the URL, number of POST vars, POST data
    curl_setopt( $ch, CURLOPT_URL, $url);
    curl_setopt( $ch, CURLOPT_POST, true);
    curl_setopt( $ch, CURLOPT_HTTPHEADER, $headers);
    curl_setopt( $ch, CURLOPT_RETURNTRANSFER, true);
    //curl_setopt( $ch, CURLOPT_POSTFIELDS, json_encode( $fields));

    curl_setopt($ch, CURLOPT_SSL_VERIFYPEER, false);
    // curl_setopt($ch, CURLOPT_POST, true);
    // curl_setopt($ch, CURLOPT_RETURNTRANSFER, true);
    curl_setopt($ch, CURLOPT_POSTFIELDS, json_encode( $fields));

    // Execute post
    $result = curl_exec($ch);

    // Close connection
    curl_close($ch);
    //echo $result;
    //print_r($result);
    //var_dump($result);
?>
This piece of code does:
- Connect to the database.
- Retrieve Sender’s Username, Victim’s Username and Message using POST.
- Looks for the user who has the exact same Username and stores its regid in an array (I used an array because with the same method you can send the same message to different users and for doing that you’ll need an array of regids.
- THIS IS VERY IMPORTANT: Do NOT forget to put your API KEY in line 18. You’ve been keeping it for this. Use it.
- The rest just need to be there. I managed to keep it simple and set as comments the parts of the code that don’t were useful. Don’t know for certain what do they do, but if you are curious, look for it.
Save it and lets move to the next part of the tutorial.
JAVA
Finally, the most interesting part of the tutorial. This will be larger than the other ones. But I trust in your patience.
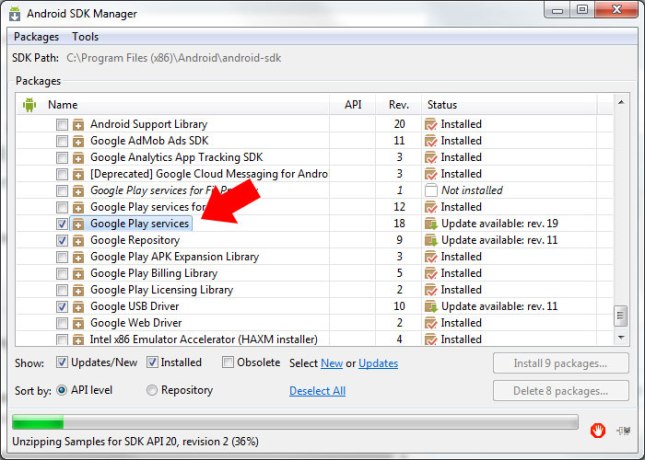
First of all, open Eclipse and I highly recommend checking if you have installed the Google Play Services package in your Android SDK Manager.
After having installed the library we will need it for our Android Project. So now right click in your Package Explorer and press Import, select Existing Android Code Into Workspace and in Root Directory look for: C:\…\android-sdk\extras\google\google_play_services\libproject\google-play-services_lib. Don’t forget to mark “Copy projects into workspace”. And press Finish.
Now that the library was added, right click in your project, go to Properties, select Android on the left menu and at the bottom click in Add… then select the google-play-services_lib library.
Now it’s time to code. I recommend putting the following code in an activity right after having logged in or where you can have a way of recognizing who is using that device.
Use and adapt this code at your will. I’ll try my best for making it as generic as possible. Then I’ll explain what it does.
MainActivity.class
public class MainActivity extends ActionBarActivity {

    private final static int PLAY_SERVICES_RESOLUTION_REQUEST = 9000;
	public static final String PROPERTY_REG_ID = "registration_id";
	private static final String PROPERTY_APP_VERSION = "appVersion";
	protected String SENDER_ID = "SENDER_ID";

	private GoogleCloudMessaging gcm =null;
	private String regid = null;
	private Context context= null;

    @Override
    protected void onCreate(Bundle savedInstanceState) {
        super.onCreate(savedInstanceState);

        context = getApplicationContext();

        if (checkPlayServices())
        {
           gcm = GoogleCloudMessaging.getInstance(getApplicationContext());
           regid = getRegistrationId(context);

           if (regid.isEmpty())
               registerInBackground();
        }
    }

    private boolean checkPlayServices()
	{
		int resultCode = GooglePlayServicesUtil.isGooglePlayServicesAvailable(this);
        if (resultCode != ConnectionResult.SUCCESS)
        {
        	if (GooglePlayServicesUtil.isUserRecoverableError(resultCode))
                GooglePlayServicesUtil.getErrorDialog(resultCode, this,
                        PLAY_SERVICES_RESOLUTION_REQUEST).show();
            else
                finish();

            return false;
        }
        return true;
	}

	private String getRegistrationId(Context context)
	{
	   final SharedPreferences prefs = getSharedPreferences("YOUR_APP_NAME", Context.MODE_PRIVATE);
	   String registrationId = prefs.getString(PROPERTY_REG_ID, "");
	   if (registrationId.isEmpty())
	       return "";

	   int registeredVersion = prefs.getInt(PROPERTY_APP_VERSION, Integer.MIN_VALUE);
	   int currentVersion = getAppVersion(context);
	   if (registeredVersion != currentVersion)
	        return "";

	   return registrationId;
	}

	private static int getAppVersion(Context context)
	{
	     try
	     {
	         PackageInfo packageInfo = context.getPackageManager()
	                    .getPackageInfo(context.getPackageName(), 0);
	         return packageInfo.versionCode;
	     }
	     catch (NameNotFoundException e)
	     {
	    	 throw new RuntimeException("Could not get package name: " + e);
	     }
	}

	private void registerInBackground()
	{
		new AsyncTask<Object, Object, Object>()
		{
			protected Object doInBackground(Object... params)
			{
				try
				{
					if (gcm == null) gcm = GoogleCloudMessaging.getInstance(context);
					regid = gcm.register(SENDER_ID);
				}
				catch (IOException ex){ }

				return null;
			}

			protected void onPostExecute(Object result)
			{
		        int appVersion = getAppVersion(context);
				SharedPreferences settings = context.getSharedPreferences("YOUR_APP_NAME", 0);
				SharedPreferences.Editor editor = settings.edit();
		        editor.putString(PROPERTY_REG_ID, regid);
		        editor.putInt(PROPERTY_APP_VERSION, appVersion);
				editor.apply();

				Intent intent = new Intent(context, ServiceRegID.class);
				intent.putExtra("Username", settings.getString("Username", ""));
				intent.putExtra("RegID", regid);
				startService(intent);
			};
		}.execute(null, null, null);
	}
}
- First, there are a few lines where we’ll put some variables to use them later. Nothing out of common, very intuitive.
- Secondly, at the onCreate method, we check if Google Play Services is available. If it is, it’ll get the registration ID from a SharedPreference value, and if it’s empty, it’ll create a new one. But if it’s not empty, it’ll check that the version of your app is the same as the last regid saved, and the last procedure repeats.
- Lastly, when a new regid is created, it’s saved in a SharedPreference value and a Service is called. Services will send data to your database and store it from your phone, using the PHP file, storing the data in the database you’ve created in your server.
- IMPORTANT: Make sure to create ServiceRegID class and change the values of the highlighted lines at your will. And to import all the needed packages at once, press CTRL+SHIFT+O
ServiceRegID.class
public class ServiceRegID extends IntentService
{
    public ServiceRegID() {
        super("ServiceRegID");
    }

    @Override
    protected void onHandleIntent(Intent intent)
    {
        String Username = intent.getStringExtra("Username");
        String RegID = intent.getStringExtra("RegID");

    	ArrayList<NameValuePair> postValores = new ArrayList<NameValuePair>();
		postValores.add(new BasicNameValuePair("Username", Username));
		postValores.add(new BasicNameValuePair("RegID", RegID));

        try
		{
        	CustomHttpClient.executeHttpPost("http://youraddress.com/regid.php", postValores);
    		Log.d("APP", "GCM sent");
		}
		catch (Exception e) { e.printStackTrace(); }
    }
}
Basically, this code stores our Username and RegID into an ArrayList and then send it using a CustomHttpClient that I will show you up next. All this data transferring occurs asynchronously from your app, so the user won’t even notice.
CustomHttpClient.class
public class CustomHttpClient {

	public static final int HTTP_TIMEOUT = 30 * 1000;
	private static HttpClient mHttpClient;

	private static HttpClient getHttpClient(){

		if(mHttpClient == null){
			mHttpClient = new DefaultHttpClient();
			final HttpParams par = mHttpClient.getParams();
			HttpConnectionParams.setConnectionTimeout(par, HTTP_TIMEOUT);
			HttpConnectionParams.setSoTimeout(par, HTTP_TIMEOUT);
			ConnManagerParams.setTimeout(par, HTTP_TIMEOUT);
		}

		return mHttpClient;

	}

	@SuppressWarnings({ "rawtypes", "unchecked" })
	public static String executeHttpPost(String url, ArrayList postValores) throws Exception{

		BufferedReader in = null;

		try{
		HttpClient cliente = getHttpClient();
		HttpPost post = new HttpPost(url);
		UrlEncodedFormEntity formEntity = new UrlEncodedFormEntity(postValores);
		post.setEntity(formEntity);

		HttpResponse respuesta = cliente.execute(post);
		in = new BufferedReader(new InputStreamReader(respuesta.getEntity().getContent(), "UTF-8"));
		StringBuffer sb = new StringBuffer("");
		String linea = "";
		String NL = System.getProperty("line.separator");
		while((linea = in.readLine())!=null){
			sb.append(linea + NL);
		}
		in.close();

		String resultado = sb.toString();

		Log.d("APP", resultado);

		return resultado;
		}finally{
			if(in != null){
				try{
				in.close();
				}catch(Exception e){
					e.printStackTrace();
				}
			}
		}

	}

}
This class is responsible of sending your data stored in an arraylist and managing what the PHP prints on the screen, saving it in a String variable.
There is no need of changing anything of this class, but it has a Timeout value that you can change if you want.
SENDING NOTIFICATIONS
Our first part of the tutorial is done, now we have to program the way a user can send a message to another device using notifications.
Firstly, imagine you have a form where the user can write in an EditText and a Button that is going to activate the service where the data will be sent.
In the button’s onClick event to will need to insert something like this:
Intent intent = new Intent(getApplicationContext(), ServiceSendMessage.class);
intent.putExtra("Message", etMessage.getText().toString());
intent.putExtra("VictimsUsername", etVictim.getText().toString()));
startService(intent);
This little piece of code will call the service and transfer to it the data we want using an Intent.
Then, we will need to create our ServiceSendMessage class like this:
ServiceSendMessage.class
public class ServiceSendMessage extends IntentService
{

    public ServiceSendMessage() {
        super("ServiceSendMessage");
    }

    @Override
    protected void onHandleIntent(Intent intent)
    {
	ArrayList<NameValuePair> postValores = new ArrayList<NameValuePair>();
        postValores.add(new BasicNameValuePair("VictimsUsername", intent.getStringExtra("VictimsUsername")));
        postValores.add(new BasicNameValuePair("Message", intent.getStringExtra("Message")));

        try
		{
        	CustomHttpClient.executeHttpPost("http://youraddress.com/sendgcm.php", postValores);
    		Log.d("APP", "GCM sent");
		}
		catch (Exception e) { e.printStackTrace(); }
    }
}
Remember to change the web address at line 17.
RETRIEVING NOTIFICATIONS
To retrieve our message, we’ll need to create several new classes. Lets start with the first one:
GcmBroadcastReceiver.class
public class GcmBroadcastReceiver extends WakefulBroadcastReceiver{

@Override
       public void onReceive(Context context, Intent intent) {
		// TODO Auto-generated method stub
           // Explicitly specify that GcmIntentService will handle the intent.
        ComponentName comp = new ComponentName(context.getPackageName(),
                GcmIntentService.class.getName());
        // Start the service, keeping the device awake while it is launching.
        startWakefulService(context, (intent.setComponent(comp)));
        setResultCode(Activity.RESULT_OK);

	}

}
This code manages the next one. So it has to be there but I can’t explain what it actually does.
GcmIntentService.class
public class GcmIntentService extends IntentService
{
	NotificationManager mNotificationManager;
    public static final String TAG = "Seba";

	public GcmIntentService() {
		super("GcmIntentService");
		// TODO Auto-generated constructor stub
	}

	@Override
	protected void onHandleIntent(Intent intent) {
		// TODO Auto-generated method stub
		Bundle extras = intent.getExtras();
		Log.d("APP", "GCM received");

		GoogleCloudMessaging gcm = GoogleCloudMessaging.getInstance(this);
		String messageType = gcm.getMessageType(intent);

		 if (!extras.isEmpty()) {

			 // If it's a regular GCM message, do some work.
	            if (GoogleCloudMessaging.
	                    MESSAGE_TYPE_MESSAGE.equals(messageType)) {
	                // This loop represents the service doing some work.
	                for (int i=0; i<5; i++) {
	                    Log.i(TAG, "Working... " + (i+1)
	                            + "/5 @ " + SystemClock.elapsedRealtime());
	                    try {
	                        Thread.sleep(500);
	                    } catch (InterruptedException e) {
	                    }
	                }
	                Log.i(TAG, "Completed work @ " + SystemClock.elapsedRealtime());
	                // Post notification of received message.

	            	mNotificationManager = (NotificationManager)
	            			getSystemService(Context.NOTIFICATION_SERVICE);

	            	mNotificationManager = (NotificationManager)getSystemService(Context.NOTIFICATION_SERVICE);

	    	        NotificationCompat.Builder mBuilder =
	    	                new NotificationCompat.Builder(getApplicationContext())
	    	        .setSmallIcon(R.drawable.ic_launcher)
	    	        .setContentTitle(extras.getString("VictimsUsername"))
	    	        .setContentText(extras.getString("Message"))
	    	        .setTicker(extras.getString("Message"))
	    	        .setContentIntent(PendingIntent.getActivity(this, 0, new Intent(getApplicationContext(), MainActivity.class), PendingIntent.FLAG_CANCEL_CURRENT))
	    	        .setAutoCancel(true);

	    	        mNotificationManager.notify(2, mBuilder.build());
	            }
	        }
		 GcmBroadcastReceiver.completeWakefulIntent(intent);
	}
}
This code does retrieve the values of the GCM Message and put it inside a notification builder.
Our last step is to add these few lines in our AndroidManifest file.
AndroidManifest.xml
<?xml version="1.0" encoding="utf-8"?>
<manifest>

    <uses-permission android:name="android.permission.GET_ACCOUNTS" />
    <uses-permission android:name="android.permission.INTERNET"/>
    <uses-permission android:name="android.permission.WAKE_LOCK" />
    <uses-permission android:name="com.google.android.c2dm.permission.RECEIVE" />
    <uses-permission android:name="android.permission.VIBRATE"/>

    <permission
        android:name="com.android.soundslave.permission.C2D_MESSAGE"
        android:protectionLevel="signature" />

    <uses-permission android:name="com.android.soundslave.permission.C2D_MESSAGE" />

    <application>

        <service android:name=".GcmIntentService" />
        <service android:name=".ServiceRegID" />
        <service android:name=".ServiceSendMessage" />

        <meta-data
            android:name="com.google.android.gms.version"
            android:value="@integer/google_play_services_version" />

        <receiver
            android:name="com.android.soundslave.GcmBroadcastReceiver"
            android:permission="com.google.android.c2dm.permission.SEND" >
            <intent-filter>

                <!-- Receives the actual messages. -->
                <action android:name="com.google.android.c2dm.intent.RECEIVE" />

                <category android:name="com.android.YOURAPP" />
            </intent-filter>
        </receiver>

    </application>

</manifest>
And that’s it. Hopefully it’ll work just fine and with no trouble at all. Just remember to adjust the code to your needs and replace the variables you need to.
If you have any doubts don’t hesitate in leaving a comment or sending me a message so I can help you with it.
Sebastian.


Asking questions are in fact nice thing if you are not understanding something fully, however this paragraph offers fastidious understanding yet.
LikeLike